# Babel 基础
# 为什么需要 babel
事实上,在开发中我们很少直接接触babel,但babel对于前端开发来说,目前是不可缺少的一部分
开发中,我们想要使用ES6+的语法,想要使用TypeScript,开发 React 项目,它们都是离不开Babel的,所以学习Babel对于我们理解代码从编写到线上的转变过程至关重要。
那么,Babel 到底是什么呢
Babel 是一个工具链,主要用于就浏览器或者缓解中将ECMAScript2015+代码转换为向后兼容版本的 JavaScript,包括语法转换、源代码转换、Polyfill实现目标缓解缺少的功能等
// babel转换的例子
// ES6语法
[1, 2, 3].map(n => n + 1)

// 转换后变成ES5语法
[1, 2, 3].map(function(n) {
  return n + 1
})
2
3
4
5
6
7
8
# Babel 命令行使用
babel本身可以作为一个独立的工具(和 postcss 一样),不和 webpack 等构建工具配置也可单独使用
如果我们需要在命令行尝试使用 babel,需要安装如下库:
- @babel/core: 这是 babel 的核心代码,必须安装
- @babel/cli: 可以让我们在命令行使用 babel
yarn add @babel/cli @babel/core --dev
# or npm install @babel/cli @babel/core -D
2
在命令行使用 babel
npx babel src --out-dir dist
- src:是源文件的目录(也可以是文件名)
- --out-dir: 指定要输出的文件夹 dist
但是这样使用,发现转换出来的代码没有变化,因为@babel/core 只是 babel 的核心,类似于 postcss,它还需要其他的插件来对代码进行编译,才能进行特定的转换
# 插件的使用
例如我们需要转换箭头函数,那么我们就可以使用箭头函数转换相关的插件:
yarn add @babel/plugin-transform-arrow-functions --dev
# or npm install @babel/plugin-transform-arrow-functions -D

npx babel src --out-dir dist --plugins=@babel/plugin-transform-arrow-functions
2
3
4
查看转换后的结果发现,箭头函数被转换成了function 函数。但是const并没有转换成var
这是因为plugin-transform-arrow-functions,并没有提供这样的功能,我们需要使用plugin-tarnform-block-scoping来完成这样的功能
yarn add @babel/plugin-tarnform-block-scoping --dev
# or npm install @babel/plugin-tarnform-block-scoping -D

npx babel src --out-dir dist --plugins=@babel/plugin-transform-block-scoping,@babel/plugin-transform-arrow-functions
2
3
4
这样源代码的const、let就会转换成var,箭头函数也会转换成function 函数
# babel 的预设 preset
如果要转换的内容过多,一个个设置是比较麻烦的,我们可以使用预设(preset)
安装@babel/preset-env 预设
yarn add @babel/preset-env --dev
# or npm install @babel/preset-env --D
2
执行如下如下命令,即可将当前版本适用的 ES6 转换成 ES5
npx babel src --out-dir dist --presets=@babel/preset-env
# Babel 的底层原理
babel 是如何做到将一段代码(ES6、TypeScript、React)转成另一段代码(ES5)的?
- 从一种源代码(原生语言)转换成另一种源代码(目标语言)就是编译器在工作,事实上我们可以将 babel 看成就是一个编译器
- Babel 编译器的作用就是将我们的源代码,转换成浏览器可以识别的另一段源代码
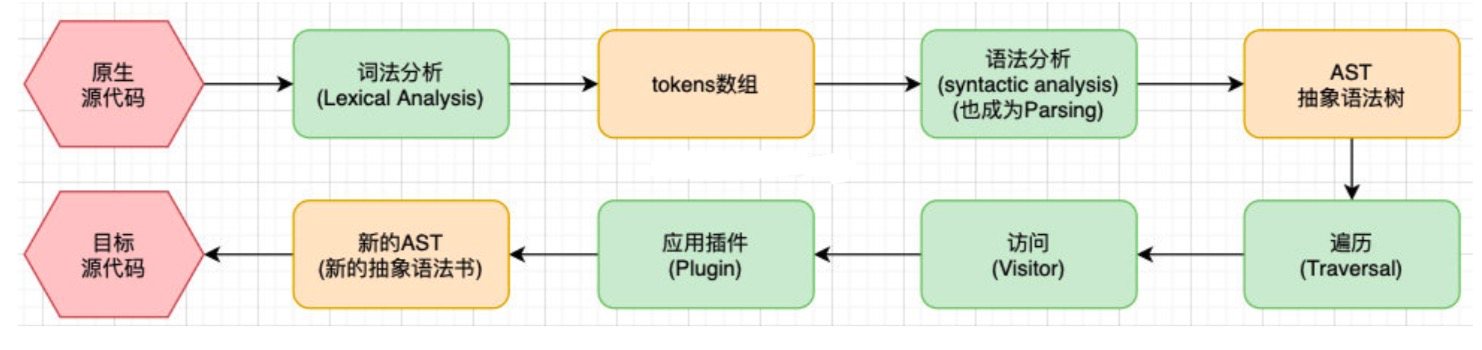
Babel 也拥有编译器的工作流程
- 解析阶段(Parsing)
- 转换阶段(Transformation)
- 生成阶段(Code Generation)
# babel 编译器执行原理
下面是 babel 的执行阶段

每个阶段又会有自己具体的工作流程:
下面具体分析一下
- 下面是一段 ES6 原生源代码
const name = "Hello World";
const foo = (name) => console.log(name);
foo(name);
2
3
通过词法分析以后会生成以下的 tokens 可点击查看转换后的 tokens
然后经过语法分析就会将tokens 数组转换成AST 语法树 可点击查看转换前的 AST 抽象语法树
然后通过遍历AST 抽象语法树,在遍历的过程中访问,并应用对应的插件对每个节点进行转换,最后形成新的AST 抽象语法树 可点击查看转换后的 AST 抽象语法树
最后再将AST 抽象语法树转换成目标源代码
"use strict";

var name = "Hello World";

var foo = function foo(name) {
  console.log(name)
}

foo(name)
2
3
4
5
6
7
8
9
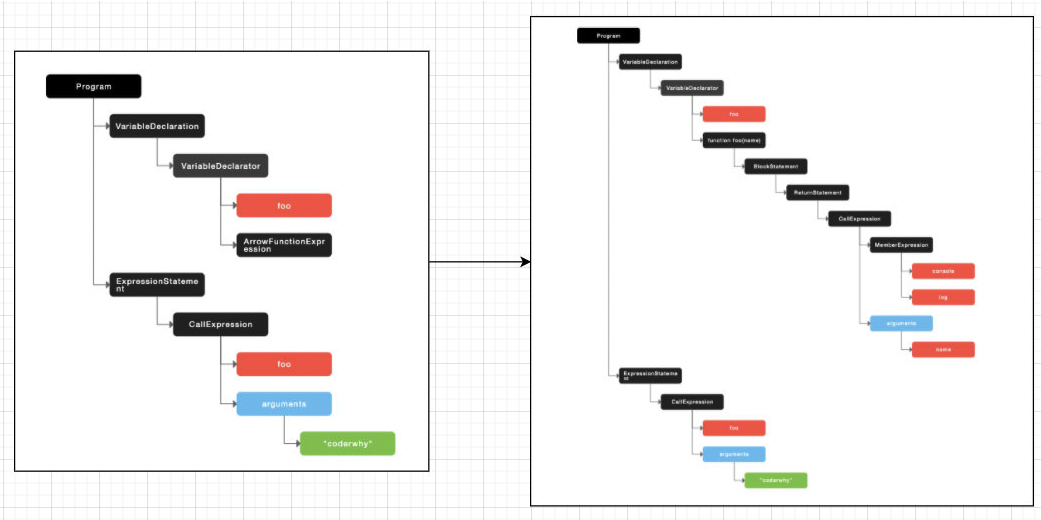
转换前后的 AST 树
# Babel 的使用
# babel-loader
在实际开发中,我们通常会在构建工具中通过配置 babel 来对其进行使用,比如在 webpack 中,此时需要安装相关的依赖
安装@babel/core 和 babel-loader
yarn add babel-loader @babel/core --dev

#or npm install babel-loader @babel/core -D
2
3
然后在 webpack.config.js 中设置 babel
module: {
  rules: [
    {
      test: /\.m?js$/,
      use: {
        loader: "babel-loader"
      }
    }
  ]
}
2
3
4
5
6
7
8
9
10
然后需要制定需要的插件
module: {
  rules: [
    {
      test: /\.m?js$/,
      use: {
        loader: "babel-loader",
        options: {
          plugins: [
            "@babel/plugin-transform-block-scoping", // 处理const,let
            "@babel/plugin-transform-arrow-functions" // 处理箭头函数
          ]
        }
      }
    }
  ]
}
2
3
4
5
6
7
8
9
10
11
12
13
14
15
16
# babel-preset
如果我们一个个去安装使用插件,那么需要手动来管理大量的 babel 插件,我们可以直接给 webpack 提供一个 preset,webpack 会根据我们的预设来加载对应的插件列表,并且将其传递给 babel。
常见的预设有三个
- env
- react
- TypeScript
- 还有一个是 flow,vue2 源码中就是使用的 flow 来规范代码
# 基本使用
安装 preset-env
yarn add @babel/preset-env --dev
# or npm install @babel/preset-env -D
2
配置 preset-env
module: {
  rules: [
    {
      test: /\.m?js$/,
      use: {
        loader: "babel-loader",
        options: {
          plugins: [["@babel/preset-env"]],
        },
      },
    },
  ];
}
2
3
4
5
6
7
8
9
10
11
12
13
# 设置目标浏览器 browserslist
我们最终的 JavaScript 代码,需要运行在目标浏览器上,就需要告知 babel 我们的目标浏览器
- browserslist 工具
- target 属性
我们可以对比不同配置下,打包的区别
- defaults 的 browserslist 设置打包后的代码
var message = "Hello World";
console.log(message);
var names = ["abc", "cba", "nba"];
names.forEach(function(item) {
  return console.info(item);
});
2
3
4
5
6
- 设置为 chrome 88 后打包的结果
const message = "Hello World";
console.log(message);
const names = ["abc", "cba", "nba"];
names.forEach((item) => console.info(item));
2
3
4
由上面两个可以看出,preset 是根据浏览器版本来确定编译需要使用的插件,转换为目标浏览器兼容的代码
# 设置目标浏览器 targets
也可以通过 targets 来进行配置
module: {
  rules: [
    {
      test: /\.m?js$/,
      use: {
        loader: "babel-loader",
        options: {
          plugins: [
            [
              "@babel/preset-env",
              {
                targets: "last 2 version",
              },
            ],
          ],
        },
      },
    },
  ];
}
2
3
4
5
6
7
8
9
10
11
12
13
14
15
16
17
18
19
20
如果同时设置了 browserslist 和 targets 的话,配置的 targets 属性会覆盖 browserslist
但是在开发中,更推荐通过 browserslist 来配置,因为类似于 postcss 工具,也会使用 browserslist,进行统一浏览器的适配
# Stage-X
# Stage-X 的 preset
要了解 Stage-X,我们需要先了解一下TC39的组织:
- TC39 是指技术委员会(Techical Committee)第 39 号
- 它是 ECMA 的一部分,ECMA 是“ECMAScript”规范下的 JavaScript 语言标准化的机构
- ECMAScript 规范定义了 JavaScript 如何一步一步的进化、发展
TC39 遵循的原则是:分阶段加入不同的语言特性,新流程设计四个不同的 Stage
- Stage 0:strawman(稻草人),任何尚未提交作为正式提案的讨论、想法变更或者补充都被认为是第 0 阶段的“稻草人”
- Stage 1:proposal(提议),提案已经被正式化,并期望解决此问题,还需要观察与其他提案的相互影响
- Stage 2:draft(草稿),Stage 2 的提案应提供规范初稿、草稿。此时,语言的实现开始观察 runtime 的具体实现是否合理
- Stage 3:candidate(候补),Stage 3 提案是建议的候选提案。在这个高级阶段,规范的编辑人员和评审人员必须在最规范上签字。Stage 3 的提案不会有太大的改变,在对外发布之前只是修正一些问题;
- Stage 4:finished(完成),进入 Stage 4 的提案将包含在 ECMAScript 的下一个修订版中;
# Babel 的 Stage-X 设置
在 babel7 之前(比如 babel6 中),我们会经常看到这个设置方式
- 它表达的含义是使用对应的 babel-preset-stage-x 预设
- 但是 babel7 开始,已经不建议使用了,建议使用 preset-env 设置
module.exports = {
  module: {
  rules: [
    {
      test: /\.m?js$/,
      use: {
        loader: "babel-loader",
        options: {
          plugins: [
            [
              "presets": ["stage-0"]
            ],
          ],
        },
      },
    },
  ];
}
}
2
3
4
5
6
7
8
9
10
11
12
13
14
15
16
17
18
19
# Babel 的配置文件
我们也可以将 babel 的配置放在一个独立的文件中,babel 给我们提供了两种配置文件的编写:
- babel.config.json(或者.js,.cjs,.mjs)文件
- .babelrc.json(或者.babelrc,.js,.cjs,.mjs)文件
目前很多的项目都采用了多包管理的方式(babel 本身、element-plus、umi 等),这两种文件的区别在于:
- .babel.json:早期使用较多的配置方式,但是对于配置 Monorepos 项目是比较麻烦的
- .babel.config.json(babel7):可以直接作用于 Monorepos 项目的子包,更加推荐
Monorepos(多包管理)是项目管理的一种方式,对应的是 multirepos(多仓库管理)
# polyfill
# 认识 polyfill
ployfill 是什么?
- 翻译:一种用于衣物、床具等的聚酯填充材料, 使这些物品更加温暖舒适;
- 理解:更像是应该填充物(垫片),一个补丁,可以帮助我们更好的使用 JavaScript;
什么时候用到 polyfill?
比如我们使用了一些语法特性(例如:Promise, Generator, Symbol 等以及实例方法例如 Array.prototype.includes 等),但是某些浏览器压根不认识这些特性,必然会报错;我们可以使用 polyfill 来填充或者说打一个补丁,那么就会包含该特性了;
# 使用 polyfill
- babel7.4.0之前,可以使用 @babel/polyfill 的包,但是该包现在已经不推荐使用了
yarn add @babel/polyfill --save
# or npm install @babel/polyfill --save
2
- babel7.4.0之后,可以通过单独引入
core-js和regenerator-runtime来完成 polyfill 的使用
yarn add core-js regenerator-runtime --save
# or npm install core-js regenerator-runtime  --save
2
注意:为了防止本地项目使用的 polyfill 和引入的包中的 polyfill 冲突,一般需要把 node_modules 文件排除在外
{
  test: /.m?js$/,
  exclude: /node_modules/,
  use: "babel-loader"
}
2
3
4
5
# 配置 babel.config.js
我们需要在 babel.config.js 文件中进行配置,给 preset-env 配置一些属性:
- useBuiltIns:设置以什么样的方式来使用 polyfill,其对应了 3 个常见的值
- false:打包后的文件不使用 polyfill 来进行适配,并且这个时候不需要设置 corejs 属性
- usage:会根据源代码中出现的语言特性,自动检测所需要的 polyfill,
- 这样可以确保最终包里的 polyfill 数量的最小化,打包的包相对会小;
- 可以设置 corejs 属性来确定 corejs 的版本
- 需要在
webpack.config.js中设置排除 node_modules
module.exports = {
  presets: [
    [
      "@babel/preset-env",
      {
        useBuiltIns: "usage",
        corejs: 3.8,
      },
    ],
  ],
};
2
3
4
5
6
7
8
9
10
11
- entry:如果我们依赖的某一个库本身使用了某些 polyfill 的特性,但因为我们使用的是
usage,所以之后用户浏览器就可能会报错,此时可以使用 entry,- 并且需要在入口文件中添加
import 'core-js/stable'; import 'regenerator-runtime/runtime, - 这样做会根据 browserlist 目标导入所以的 polyfill,但对应的包也会很大
- 并且需要在入口文件中添加
// babel.config.js
module.exports = {
  presets: [
    [
      "@babel/preset-env",
      {
        useBuiltIns: "entry",
        corejs: 3.8,
      },
    ],
  ],
};
2
3
4
5
6
7
8
9
10
11
12
//index.js
import 'core-js/stable';
import 'regenerator-runtime/runtime
2
3
# plugin-transform-runtime
# 认识 plugin-transform-runtime
在前面我们使用的 polyfill,默认情况是添加的所有特性都是全局的
如果我们正在编写一个工具库,这个工具库需要使用 polyfill;别人在使用我们工具时,工具库通过 polyfill 添加的特性,可能会污染它们的代码;
所以,当编写工具时,babel 更推荐我们使用一个插件: @babel/plugin-transform-runtime 来完成 polyfill 的功能;
useBuiltIns and @babel/plugin-transform-runtime are mutually exclusive. Both are used to add polyfills: the first adds them globally, the second one adds them without attatching them to the global scope. You should decide which behavior you want and stick with it.
useBuiltIns 和 @babel/plugin-transform-runtime 是互斥的
# 使用 plugin-transform-runtime
安装 @babel/plugin-transform-runtime
yarn add @babel/plugin-transform-runtime --dev
# or npm install @babel/plugin-transform-runtime -D
2
使用 plugins 来配置 babel.config.js
module.exports = {
  presets: [["@babel/preset-env"]],
  plugins: [
    [
      "@babel/plugin-transform-runtime",
      {
        corejs: 3,
      },
    ],
  ],
};
2
3
4
5
6
7
8
9
10
11
注意:因为我们使用率 corejs3,所以我们需要安装对应的库:
corejs option | Install command |
|---|---|
false | npm install --save @babel/runtime |
2 | npm install --save @babel/runtime-corejs2 |
3 | npm install --save @babel/runtime-corejs3 |
# React 的 jsx 支持
在我们编写 react 代码时,react 使用的语法是 jsx,jsx 是可以直接使用 babel 来转换的
对 react jsx 代码进行处理需要如下的插件:
- @babel/plugin-syntax-jsx
- @babel/plugin-transform-react-jsx
- @babel/plugin-transform-react-display-name
但是在开发中,我们并不需要一个个去安装这个插件,我们依然可以使用 preset 来配置
安装 preset-react
yarn add @babel/preset-react --dev
# or  npm install @babel/preset-react -D
2
配置 preset-react
module.exports = {
  presets: ["@babel/preset-env", "@babel/preset-react"],
};
2
3
此时就可以使用 react 的 jsx 了
# TypeScript 的编译
在现在的项目开发中,我们会使用 TypeScript 来开发,那么 TypeScript 代码是需要转换成 JavaScript 代码
可以通过 TypeScript 的 compiler 来转换成 JavaScript
yarn add typeScript --dev
# or npm install typeScript -D
2
3
另外 TypeScript 的编译配置信息我们通常会编写一个 tsconfig.json 文件:
tsc --init
这样就会生成一个 tsconfig.json 文件夹,之后我们可以运行npx tsc来编译自己的代码
# ts-loader
如果我们希望在 webpack 中使用 TypeScript,那么我们可以使用 ts-loader 来处理 ts 文件
yarn add ts-loader --dev
# or npm install ts-loader -D
2
配置 ts-loader
{
  test: /\.ts$/,
  exclude: /node_modules/,
  use: ["ts-loader"]
}
2
3
4
5
# 使用 babel-loader 编译 TS
除了可以使用 TypeScript Complier 来编译 TypeScript 之外,还可以使用 Babel
- Babel 是对 TypeScript 进行支持的
- 我们可以使用插件:@babel/transform-typescript
- 但更推荐直接使用 preset:@babel/preset-typescript
安装@babel/preset-typescript
yarn add @babel/preset-typescript --dev
# or npm install @babel/preset-typescript -D
2
babel 配置
module.exports = {
  presets: [
    [
      "@babel/preset-env",
      {
        useBuiltIns: "usage",
        corejs: 3.8,
      },
    ],
    ["@babel/preset-react"],
    ["babel/preset-typescript"],
  ],
};
2
3
4
5
6
7
8
9
10
11
12
13
{
  test: /\.ts$/,
  exclude: /node_modules/,
  use: [
    "babel-loader"
  ]
}
2
3
4
5
6
7
# ts-loader 和 babel-loader 选择
ts-loader:
- 优点:可以将 ts 转换成 js,且在编译过程中会对类型错误进行检测
- 缺点:不能为我们添加对应的 polyfill,需要借助于 babel 来完成 polyfill 的填充功能
babel-loader:
- 优点:可以将 ts 转换成 js,并且可以实现 polyfill 的功能
- 缺点:不能再编译过程中对类型错误进行检测
官方给出的最佳实践就是使用 Babel-loader 来完成代码的转换,使用 tsc 来进行类型的检查
我们可以在 scripts 中添加两个脚本,用于类型检查
- 执行
yarn type-check对 ts 代码的类型进行检测 - 执行
yarn type-check-watch可以实时的检测类型错误
"scripts": {
  "build": "webpack",
  "type-check": "tsc --noEmit",
  "type-check-watch": "yarn type-check --watch"
}
2
3
4
5
注意:tsc默认会生成一个ts对应的js文件,我们可以给它添加--noEmit参数,就不会生成js
# tokens 数组以及转换前后的 AST 抽象语法树
tokens 数组
[
  {
      "type": "Keyword",
      "value": "const"
  },
  {
      "type": "Identifier",
      "value": "foo"
  },
  {
      "type": "Punctuator",
      "value": "="
  },
  {
      "type": "Punctuator",
      "value": "("
  },
  {
      "type": "Identifier",
      "value": "name"
  },
  {
      "type": "Punctuator",
      "value": ")"
  },
  {
      "type": "Punctuator",
      "value": "=>"
  },
  {
      "type": "Identifier",
      "value": "console"
  },
  {
      "type": "Punctuator",
      "value": "."
  },
  {
      "type": "Identifier",
      "value": "log"
  },
  {
      "type": "Punctuator",
      "value": "("
  },
  {
      "type": "Identifier",
      "value": "name"
  },
  {
      "type": "Punctuator",
      "value": ")"
  },
  {
      "type": "Punctuator",
      "value": ";"
  },
  {
      "type": "Identifier",
      "value": "foo"
  },
  {
      "type": "Punctuator",
      "value": "("
  },
  {
      "type": "String",
      "value": "\"coderwhy\""
  },
  {
      "type": "Punctuator",
      "value": ")"
  },
  {
      "type": "Punctuator",
      "value": ";"
  }
]
2
3
4
5
6
7
8
9
10
11
12
13
14
15
16
17
18
19
20
21
22
23
24
25
26
27
28
29
30
31
32
33
34
35
36
37
38
39
40
41
42
43
44
45
46
47
48
49
50
51
52
53
54
55
56
57
58
59
60
61
62
63
64
65
66
67
68
69
70
71
72
73
74
75
76
77
78
转换前 AST 抽象语法树
{
  "type": "Program",
  "body": [
    {
      "type": "VariableDeclaration",
      "declarations": [
        {
          "type": "VariableDeclarator",
          "id": {
            "type": "Identifier",
            "name": "foo"
          },
          "init": {
            "type": "ArrowFunctionExpression",
            "id": null,
            "params": [
              {
                "type": "Identifier",
                "name": "name"
              }
            ],
            "body": {
              "type": "CallExpression",
              "callee": {
                "type": "MemberExpression",
                "computed": false,
                "object": {
                  "type": "Identifier",
                  "name": "console"
                },
                "property": {
                  "type": "Identifier",
                  "name": "log"
                }
              },
              "arguments": [
                {
                  "type": "Identifier",
                  "name": "name"
                }
              ]
            },
            "generator": false,
            "expression": true,
            "async": false
          }
        }
      ],
      "kind": "const"
    },
    {
      "type": "ExpressionStatement",
      "expression": {
        "type": "CallExpression",
        "callee": {
          "type": "Identifier",
          "name": "foo"
        },
        "arguments": [
          {
            "type": "Literal",
            "value": "coderwhy",
            "raw": "\"coderwhy\""
          }
        ]
      }
    }
  ],
  "sourceType": "script"
}
2
3
4
5
6
7
8
9
10
11
12
13
14
15
16
17
18
19
20
21
22
23
24
25
26
27
28
29
30
31
32
33
34
35
36
37
38
39
40
41
42
43
44
45
46
47
48
49
50
51
52
53
54
55
56
57
58
59
60
61
62
63
64
65
66
67
68
69
70
转换后 AST 抽象语法树
{
  "type": "Program",
  "body": [
    {
      "type": "VariableDeclaration",
      "declarations": [
        {
          "type": "VariableDeclarator",
          "id": {
            "type": "Identifier",
            "name": "foo"
          },
          "init": {
            "type": "FunctionExpression",
            "id": {
              "type": "Identifier",
              "name": "foo"
            },
            "params": [
              {
                "type": "Identifier",
                "name": "name"
              }
            ],
            "body": {
              "type": "BlockStatement",
              "body": [
                {
                  "type": "ReturnStatement",
                  "argument": {
                    "type": "CallExpression",
                    "callee": {
                      "type": "MemberExpression",
                      "computed": false,
                      "object": {
                        "type": "Identifier",
                        "name": "console"
                      },
                      "property": {
                        "type": "Identifier",
                        "name": "log"
                      }
                    },
                    "arguments": [
                      {
                        "type": "Identifier",
                        "name": "name"
                      }
                    ]
                  }
                }
              ]
            },
            "generator": false,
            "expression": false,
            "async": false
          }
        }
      ],
      "kind": "var"
    },
    {
      "type": "ExpressionStatement",
      "expression": {
        "type": "CallExpression",
        "callee": {
          "type": "Identifier",
          "name": "foo"
        },
        "arguments": [
          {
            "type": "Literal",
            "value": "coderwhy",
            "raw": "\"coderwhy\""
          }
        ]
      }
    }
  ],
  "sourceType": "script"
}
2
3
4
5
6
7
8
9
10
11
12
13
14
15
16
17
18
19
20
21
22
23
24
25
26
27
28
29
30
31
32
33
34
35
36
37
38
39
40
41
42
43
44
45
46
47
48
49
50
51
52
53
54
55
56
57
58
59
60
61
62
63
64
65
66
67
68
69
70
71
72
73
74
75
76
77
78
79
80
81